Do you want to learn how to create a WordPress Website? In this article, we explain it in detail. This is a step-by-step guide to create a simple wordPress blog or website. You do not need to have any coding skills or development expertise. Follow these steps.
Step To Create a Simple WordPress blog:
1. Choose Domain and Hosting
Choose a domain for the website whatever your business name is or that is totally your choice to choose a domain for your website. Either It can be your business name or anything else which you love to hear It doesn’t matter what is your domain name to create a website. A domain name is a name from which the user can identify the site.
2. Connect Domain and Hosting
Remember if your domain or hosting is taken from the same vendor then the domain will point with the server itself but if your domain name and hosting server both are from different vendors then first you have to point your domain name to the server | For this, you must have been given the nameserver records from the hosting provider through mail or you can find it from the server, if yes, then you will have to update them by going to the DNS zone file of your domain ns record. After updating the nameserver or A record into the domain DNS file, it will take about half an hour to 12 hours to point to the server.
3. Download WordPress
WordPress is a Free Opensource CMS system that is free to download. You can download WordPress from its official website wordpress.org. You will always find the latest version. You can also download a previous or older version of WordPress from the WordPress repository (See WordPress All Release)
4. Create a Database
Before installing WordPress, you need to create a database on the server. To create a database, first, you need to go to the PHPMyAdmin panel of your server (if you can’t find the PHPMyAdmin link, contact your service provider). After going to PHPMyAdmin, create a new database there and connect it with a username and password. When your database is created, copy the username, password, and database details on a notepad and keep it safe. This information will be required during WordPress installation.
5. Install WordPress
Before installing WordPress, go to the root path of your server where you want to install WordPress and go to the server directory and upload the WordPress zip file that you downloaded from the WordPress repository. Extract (unzip) the zip folder into the server. If you are uploading files to your server using FTP (File Transfer Protocol) software like FileZilla, CoreFile, WinSCP, etc., then first extract (unzip) the downloaded WordPress zip folder and then upload those unzip files into your server via your FTP client.

Now open your browser and enter your domain or website path like if you uploaded the site into http(s)://domain/mysite folder then you need to run the same url or if you uploaded the files directly on your root path then just run the same main domain. once you will hit the link an installation window will appear on your browser ( See picture-1 Below):
Now Select the Language of your interest and then click to continue button. Then you a next screen will appear after clicking on the continue button (see picture-2 below):

Once you will see this screen click on Let’s go button and you will land to next step to enter database credentials (See Picture-3 below: )

Now put your database credentials like database name, user name, password, and host as we have already created in step no. 4. After putting credentials in the fields, click on the submit button and you will redirect to the next screen if your database credentials are correct (see the picture-4 below:)

after this click on “Run the Installation” button a new screen of Website Information will appear where you will be asked for a Website title, admin user name, password, admin email id, etc.
(See Picture-5 Below:)

Once you will fill all the complete Details then press the Install WordPress button at the bottom
and your installation is complete and you will see the screen (See picture-6 below) :

Click on the “Log In” button and you will redirect to the admin login screen. Put your credentials which you set in prev step (see the picture no -5). Now your WordPress site is installed successfully with the default
6. Install WordPress theme
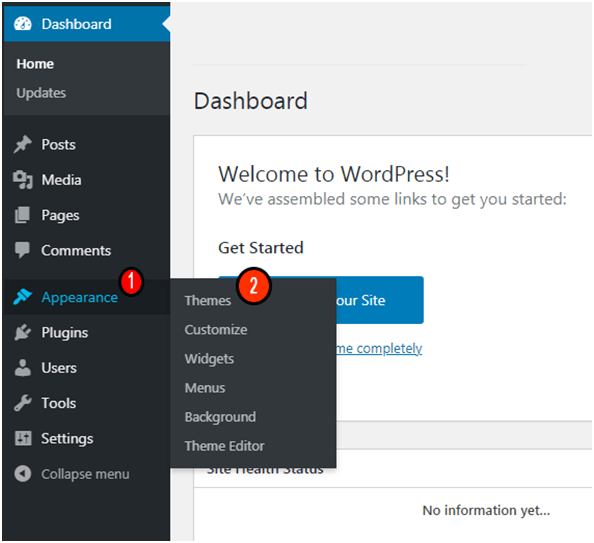
Pick a WordPress theme Online. By default, you will see a basic theme installed on your website which comes along with WordPress CMS. If you are fine with this theme then you can start posting from immediate effects. Otherwise, you can choose a theme from an online WordPress Repositor. You just need to login into the website admin panel and find the Theme under the appearance menu located in the left sidebar (See Picture – 1):

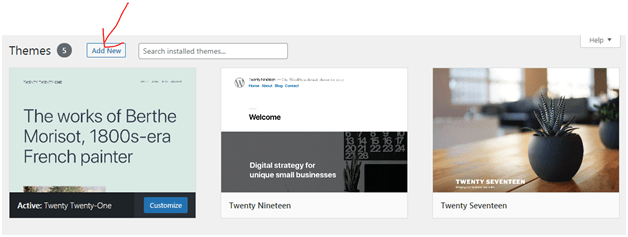
On click on Themes ( no.2), you will see a list of themes installed, and also there will be an Add New Button. Click on Add New button (see in the picture – 2 below ):

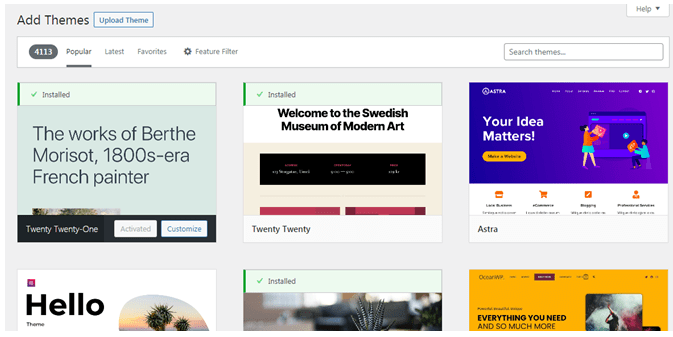
and you will redirect to the theme listing and searching page (See picture-3 below):

Now you can select the theme of your interest and best match with your business. Now your WordPress website is installed and ready to use. Start posting
6. Install Plugins to extend the functionality:
There are many important and useful plugins that you must have installed on your WordPress website for different uses like Security, SEO, website loading speed, etc. You should have installed these plugins to addon additional features and functionality to your website.


